Before reaching for the pruning tools you need a clear idea of what you are hoping to achieve and in the context of this post it is a healthy plant which fits, both physically and aesthetically into its location in the garden. When you have finished you want something which does not overwhelm the area around it or look unattractive to the eye.
Pruning is not the easiest of things to teach, partly because of the different requirements of different plants but equally because it is as much art as science. To start with a few preliminaries:
- Plants don’t always respond well to pruning – not all plants will come again if you cut into old wood, this includes nearly all the conifers but also a number of others.
- Those that do, don’t always do as you expect – often a plant will respond to pruning by producing a mass of soft shoots rather than one or two useful ones.
- Once you’ve cut it off you can’t put it back – so if in doubt delay cutting and then take off a bit at a time to see how it looks
- Think ahead to prevent accidents – you would be amazed at the number of people who actually cut off the branch they are sitting on!
- Make sure you are suitably equipped – as you will never make a tidy job using poor/blunt tools.
- Plan first, act second – have a really good look at what you’re tackling and how your cuts are going to affect the plant before you do anything.
The first step is to remove any dead and diseased material, the second remove crossing branches and the final one is to shape the plant.
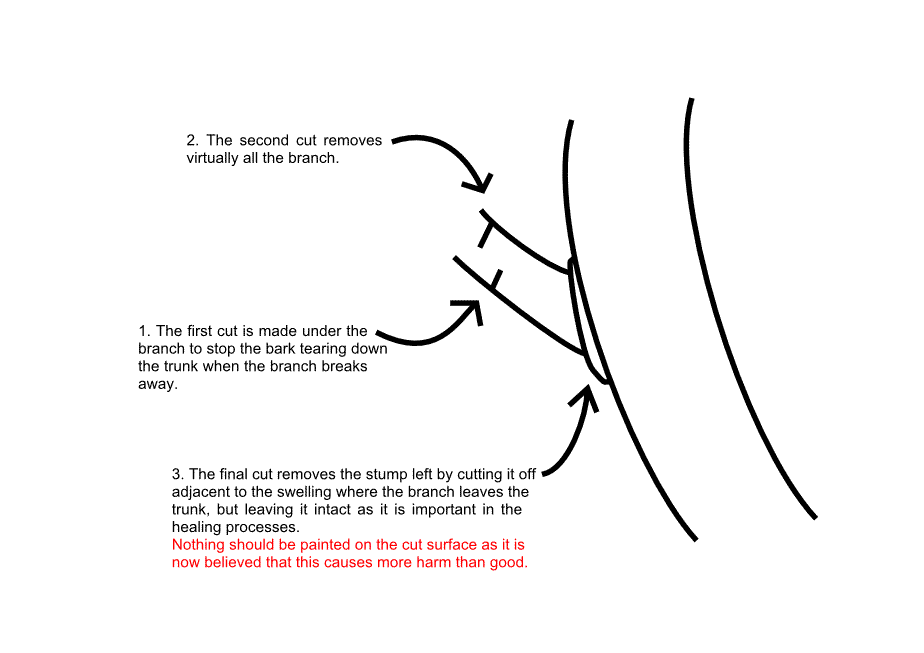
Any dead or diseased parts of the plant are going to be no benefit to you or the plant and if not yet diseased it probably soon will be. Yes that branch may be in just the right place for what you wanted but if it not healthy it’s never going to look right and will end up causing problems further along the line so cut it back to healthy growth just above a bud or close to where it branched off a larger part. If it’s a larger branch do it in three stages to prevent it damaging the rest of the plant when it breaks away from the plant. Work methodically, starting with the larger branches so that any damage caused by removing them can be cleared up as you go.
Once we’re left with a collection of healthy branches we can turn our attention to any which are crossing through the bush. This is not a hard and fast rule as the first but there are reasons for it. First such branches almost always end up rubbing against one another as the plant moves in the wind. This causes the bark to be worn away at these points and it is the bark which acts as the plant’s main defence against diseases getting in. This means that sooner or later these places will be where problems are going to occur. The second reason is that plant diseases tend to benefit from a still moist atmosphere and this is more likely to occur in a tangle of branches than a nice open structure which the air can move through freely. Finally it tends to be more visually pleasing not to have a lot of branches crossing through.
Now we can come to shaping the plant and this is much more a matter of personal taste.There are though a few things to consider. If by nature it’s a big plant and you are going to cut it down a long way , then it will quickly re-grow and you will soon need to repeat the process. Should you allow it more room or is it simply not in a suitable place? If you are trying to lower the height of the plant, remove the tallest branches completely low down where they divide and allow the shorter branches which are left to form the new top. Nothing looks worse than just choosing a height and cutting everything off in a level line at this height, but you regularly see this done and often by people claiming to be professional. Once done the plant is very unlikely ever to recover aesthetically.
The important thing is to take your time and regularly step back to get an overall view of the job as you go. Whatever plan you start with you will have to fine tune it as you go as the job progresses and new ideas occur.


